Commercial freezers are large electrical products containing refrigeration systems, glass, sheet metal, insulation systems, glass, sheet metal, insulation, controllers, shelves, baskets, compressors, and accessories.
Damage or manufacturing errors may not always be visible from the outside.
For example, a freezer may look complete but still have:
- Incorrect voltage
- An unstable temperature controller
- Loose electrical connections
- A damaged door seal
- Missing shelves
- Incorrect branding
- Insufficient packaging
- Refrigeration-system problems
A structured inspection gives buyers a final opportunity to confirm that the shipment meets the agreed requirements.
It also creates evidence through:
- Photos
- Videos
- Test records
- Packing lists
- Serial-number records
- Container-loading reports
These records can help clarify responsibility if damage or quantity discrepancies are discovered later.
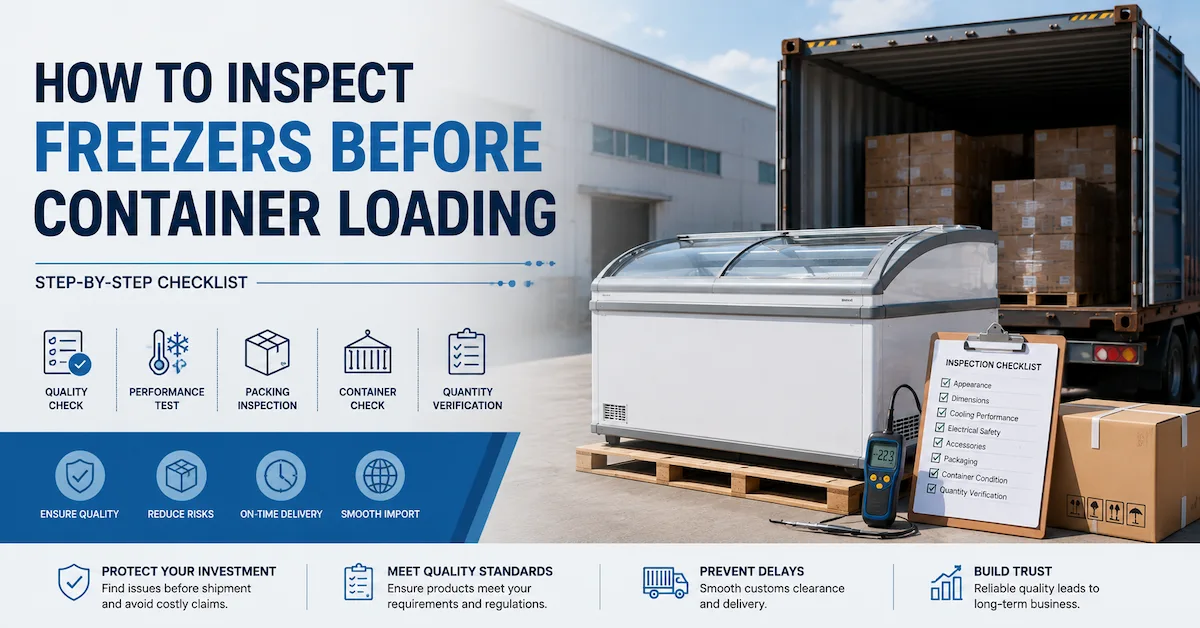
When Should the Inspection Be Completed?
Inspection should normally take place after production is complete but before products are sealed inside the container.
The recommended sequence is:
- Production completion
- Product cooling and performance testing
- Final appearance inspection
- Specification verification
- Packaging inspection
- Container inspection
- Loading supervision
- Container sealing
- Loading-report confirmation
Buyers should avoid inspecting products too early, when production is still incomplete.
A useful inspection standard is to ensure that:
- All ordered units are completed
- Products have passed factory testing
- Packaging materials are ready
- Accessories and documents are prepared
- The shipping container is available
Step 1: Confirm the Purchase Order and Inspection Standard
Before checking the physical products, the inspector should review the approved order documents.
These may include:
- Purchase order
- Product specification sheet
- Proforma invoice
- Approved sample
- Technical drawing
- Packaging artwork
- Logo artwork
- User manual
- Quality agreement
- Inspection checklist
The inspection team should know exactly what has been ordered.
Important information includes:
| Inspection Item | Details to Confirm |
|---|---|
| Product model | Correct model number |
| Quantity | Total units and quantity per model |
| Capacity | Required internal volume |
| Dimensions | Approved external dimensions |
| Temperature | Required operating range |
| Voltage | Destination-market electrical standard |
| Frequency | 50 Hz or 60 Hz |
| Plug | Correct plug type |
| Branding | Logo, labels, and colors |
| Packaging | Standard or customized |
| Accessories | Shelves, baskets, keys, manuals |
| Certification labels | Required marks and rating plates |
Without an approved reference document, inspection results can become subjective.
Step 2: Verify Product Quantity and Model Numbers
The first physical check should confirm whether the completed quantity matches the order.
Inspectors should count:
- Total freezer units
- Quantity per model
- Quantity per color
- Quantity per voltage
- Quantity per branding version
Model numbers should be checked against:
- Rating labels
- Outer cartons
- Packing lists
- Production records
Mixed-model orders require particular attention because different freezer models may have similar appearances.
A quantity discrepancy should be resolved before loading begins.
Step 3: Inspect the External Appearance
Each freezer should be checked for visible manufacturing or handling defects.
Inspect:
- Cabinet surfaces
- Doors and lids
- Glass panels
- Handles
- Control panels
- Wheels and casters
- Ventilation grilles
- Decorative panels
- Branding
- Labels
Common appearance problems include:
- Scratches
- Dents
- Paint defects
- Rust marks
- Uneven gaps
- Loose handles
- Broken plastic parts
- Damaged glass
- Incorrect logo placement
- Dirty cabinet surfaces
Appearance standards should be especially strict for retail display freezers because they will be installed in customer-facing locations.
Minor cosmetic defects that may be acceptable for warehouse storage equipment may not be acceptable for supermarket display products.
Step 4: Measure Product Dimensions
Inspectors should compare the actual freezer dimensions with the approved specification.
Measure:
- Width
- Depth
- Height
- Door dimensions
- Internal dimensions
- Shelf spacing
- Basket dimensions
Dimension checks are important because even a small difference can affect:
- Store installation
- Doorway access
- Shelf alignment
- Container utilization
- Customer project layouts
For customized supermarket projects, several units from each production batch should be measured rather than checking only one sample.
Step 5: Check Doors, Lids, Seals, and Hardware
Doors and lids should open and close smoothly.
Inspect:
- Hinges
- Sliding tracks
- Door alignment
- Handles
- Locks
- Magnetic seals
- Gaskets
- Glass panels
- Closing force
The seal should make complete contact with the cabinet.
A damaged or uneven gasket may cause:
- Cold-air leakage
- Frost accumulation
- Higher energy consumption
- Longer compressor operation
- Unstable internal temperatures
For glass-door upright freezers, inspectors should verify that each door closes automatically when required and does not rub against adjacent doors.
For sliding-glass chest or island freezers, the glass should move smoothly without excessive resistance.
Step 6: Verify Internal Components and Accessories
The interior configuration should match the purchase order.
Check:
- Shelves
- Baskets
- Dividers
- Shelf supports
- LED lighting
- Drain plugs
- Internal fans
- Temperature sensors
- Product-loading lines
- Keys
- Handles
- Manuals
Accessories should be counted and recorded.
Small components are often packed separately and can be missed during loading. These may include:
- Casters
- Screws
- Shelf brackets
- Door keys
- Drainage parts
- Spare fuses
- Branding accessories
Accessory cartons should be labeled clearly and included in the packing list.
Step 7: Check Electrical Specifications
Electrical errors can make the freezer unusable in the destination market.
Inspectors should verify:
- Voltage
- Frequency
- Rated power
- Current
- Plug type
- Power-cord length
- Grounding
- Controller model
- Rating label
The information on the rating label should match the actual configuration.
For example, the order may require:
- 220–240 V
- 50 Hz
- EU plug
A product labeled for 110–120 V or equipped with another plug type should not be loaded until corrected.
Inspectors should also check that:
- The power cord is undamaged
- Electrical covers are secure
- Wiring is not exposed
- The plug is firmly attached
- The grounding connection is correct
Step 8: Test Cooling Performance
Cooling-performance testing is one of the most important parts of freezer inspection before container loading.
The test should confirm that the freezer can:
- Start correctly
- Reach the required temperature
- Maintain stable operation
- Recover after door opening
- Operate without abnormal noise
The factory should record:
- Starting ambient temperature
- Starting cabinet temperature
- Test duration
- Final temperature
- Controller reading
- Independent thermometer reading
- Compressor operation
Depending on the product, testing may include:
- Pull-down testing
- Temperature-stability testing
- Door-opening recovery
- Defrost-operation testing
- Alarm testing
Buyers should confirm the test conditions because an unloaded freezer in a cool test room may perform differently from a fully loaded unit in a hot supermarket.
Step 9: Inspect Compressor and Refrigeration Operation
Inspectors should listen for abnormal sounds and examine the refrigeration system.
Check:
- Compressor operation
- Fan operation
- Refrigerant piping
- Condenser
- Evaporator
- Vibration
- Oil marks
- Refrigerant leakage indicators
Potential warning signs include:
- Unusual vibration
- Repeated compressor restarting
- Excessive noise
- Loose copper pipes
- Oil stains around joints
- Poor cooling speed
- Controller errors
Refrigeration-system problems should be repaired and retested before packaging.
Step 10: Check Temperature Controller and Display
The controller should be easy to operate and correctly configured.
Verify:
- Display accuracy
- Set temperature
- Actual temperature
- Alarm functions
- Defrost settings
- Button operation
- Lighting control
- Factory presets
The displayed temperature can be compared with a calibrated independent thermometer.
A large difference may indicate:
- Sensor-position problems
- Controller calibration errors
- Sensor damage
- Improper configuration
For OEM projects, confirm that the controller instructions in the user manual match the installed controller.
Step 11: Confirm Branding and Product Labels
Private-label orders require additional inspection.
Check:
- Brand logo
- Logo position
- Logo color
- Model number
- Rating label
- Warning labels
- Energy labels
- Barcode
- Carton printing
- Shipping marks
Common branding errors include:
- Misspelled brand names
- Incorrect colors
- Old logo versions
- Misaligned stickers
- Wrong model numbers
- Missing certification marks
The approved artwork should be available during inspection for direct comparison.
Snowsea’s OEM and ODM refrigeration solutions can include customized logos, labels, cabinet colors, manuals, and packaging.
Step 12: Inspect User Manuals and Documents
The correct documents should be prepared for every shipment.
These may include:
- User manuals
- Installation instructions
- Warranty cards
- Product specification sheets
- Commercial invoice
- Packing list
- Certificate of origin
- Test reports
- Compliance documents
Manuals should match:
- Product model
- Language
- Voltage
- Controller
- Safety requirements
- Maintenance procedures
Documents should not refer to an older or different freezer model.
Step 13: Inspect Packaging Quality
Packaging must protect the freezer during factory handling, container loading, ocean transport, unloading, and warehouse storage.
Check:
- Protective film
- Foam protection
- Corner guards
- Carton strength
- Bottom support
- Wooden frame or pallet
- Strapping
- Moisture protection
- Accessory placement
- Carton labels
Glass-door freezers need additional protection around:
- Door edges
- Glass surfaces
- Handles
- Upper corners
- Control panels
The packaging should prevent the freezer from moving inside the carton.
Buyers should also confirm whether the packaging is suitable for:
- Container stacking
- Forklift handling
- Long-distance shipping
- Humid environments
- Multiple loading transfers
Step 14: Inspect the Shipping Container
The container should be inspected before any freezers are loaded.
Check:
- Container number
- Container type
- Interior cleanliness
- Floor condition
- Roof condition
- Door operation
- Wall damage
- Water leakage
- Odor
- Rust
- Sharp objects
- Previous cargo contamination
A simple light test can help identify holes. With the doors closed, visible daylight inside the container may indicate damage.
The container should be dry and free from:
- Water
- Oil
- Chemicals
- Strong odors
- Nails
- Broken wood
- Pest contamination
A damaged or dirty container should be rejected before loading.
Step 15: Verify the Loading Plan
Commercial freezers should be loaded according to a prepared plan.
The plan should consider:
- Product dimensions
- Carton dimensions
- Weight distribution
- Model sequence
- Unloading order
- Door clearance
- Container capacity
- Damage prevention
Heavy units should be positioned securely.
Freezers should not be forced into spaces that are too narrow, as this can damage cartons, handles, panels, or glass.
Mixed-model orders should be loaded in a logical order, especially when different customers or warehouses will receive different products.
Step 16: Supervise Container Loading
During loading, inspectors should observe:
- Forklift handling
- Product orientation
- Carton condition
- Spacing
- Securing methods
- Quantity loaded
- Product sequence
- Container utilization
Workers should avoid:
- Dragging freezers
- Tilting them excessively
- Hitting container walls
- Lifting from weak carton areas
- Stacking beyond packaging limits
Where necessary, use:
- Straps
- Wooden blocks
- Air bags
- Anti-slip materials
- Protective boards
The objective is to prevent movement during transportation.
Step 17: Record Photos and Videos
A complete loading record should include photographs of:
- Empty container
- Container number
- Interior condition
- Each product model
- Product labels
- Packaging
- Loading stages
- Final loaded container
- Container doors
- Seal number
Videos may also document:
- Cooling tests
- Door operation
- Controller operation
- Loading process
These records should be saved with the order number and shipment documents.
Step 18: Confirm the Container Seal
After loading is complete, the container doors should be closed and sealed.
Record:
- Container number
- Seal number
- Loading date
- Quantity loaded
- Loading location
- Shipping reference
The seal number should match the shipping documents.
Photos should clearly show both the container number and seal.
Freezer Pre-Loading Inspection Checklist
| Inspection Area | Main Checks |
|---|---|
| Order details | Model, quantity, specifications |
| Appearance | Scratches, dents, paint, glass |
| Dimensions | Width, depth, height |
| Doors and lids | Alignment, seals, hinges |
| Interior | Shelves, baskets, lighting |
| Electrical | Voltage, frequency, plug |
| Cooling | Pull-down and temperature stability |
| Controller | Display, settings, alarms |
| Branding | Logo, labels, model numbers |
| Accessories | Keys, manuals, spare parts |
| Packaging | Foam, carton, pallet, protection |
| Container | Clean, dry, undamaged |
| Loading | Quantity, arrangement, securing |
| Records | Photos, videos, seal number |
Factory Inspection or Third-Party Inspection?
Buyers may use factory inspection, third-party inspection, or both.
Factory Inspection
Factory inspection is normally completed by the manufacturer’s quality-control team.
Advantages include:
- Faster communication
- Product knowledge
- Immediate correction
- Lower cost
Third-Party Inspection
An independent inspector checks the shipment on behalf of the buyer.
Advantages include:
- Independent reporting
- Buyer-defined inspection standards
- Additional quantity verification
- Loading supervision
For large orders, first-time suppliers, or high-value projects, buyers may choose third-party inspection in addition to factory quality control.
Common Inspection Mistakes
Checking Only Product Appearance
A freezer can look good while having cooling or electrical problems.
Inspecting Only One Unit
Random sampling should reflect the order size and model variety.
Ignoring Accessories
Missing shelves, keys, or manuals can create installation problems.
Skipping Container Inspection
A leaking or contaminated container can damage correctly packaged products.
Failing to Record Evidence
Without photos, videos, and written records, later claims may be difficult to verify.
Loading Before the Inspection Is Complete
Once products are inside the container, detailed inspection becomes difficult.
Not Confirming the Seal Number
Incorrect seal records may cause shipping-document or customs problems.
How Snowsea Supports Pre-Shipment Inspection
Snowsea supplies commercial refrigeration equipment for importers, distributors, supermarkets, food retailers, hospitality suppliers, and cold-chain companies.
Inspection and loading support may include:
- Product specification confirmation
- Appearance inspection
- Cooling-performance testing
- Electrical inspection
- Branding verification
- Accessory checking
- Export packaging
- Loading-quantity verification
- Container-loading records
- Shipping-document preparation
Buyers can review Snowsea’s manufacturing and export capabilities on the About Snowsea page.
FAQ
What should be checked during freezer inspection before container loading?
Inspect the product quantity, model, appearance, dimensions, cooling performance, voltage, plug, accessories, branding, packaging, container condition, and loading arrangement.
Should every commercial freezer be tested?
Factories should apply an appropriate testing and inspection process. Critical performance checks may cover every unit, while some dimensional or detailed inspections may use an agreed sampling standard.
How long should a commercial freezer cooling test take?
The test duration depends on the freezer type, cabinet size, temperature requirement, ambient conditions, and factory testing procedure.
Can buyers appoint a third-party inspection company?
Yes. Buyers can arrange an independent pre-shipment inspection and container-loading supervision.
Why should the empty container be inspected?
A damaged, wet, dirty, or contaminated container can damage freezers and packaging during transportation.
What photos should be included in a loading report?
The report should include the empty container, product models, labels, cartons, loading stages, final arrangement, container number, and seal number.
Conclusion
A structured freezer inspection before container loading helps buyers confirm that commercial refrigeration products meet the approved specifications before international shipment.
The inspection should cover appearance, dimensions, doors, electrical systems, cooling performance, controllers, accessories, branding, documents, packaging, container condition, loading quantity, and shipment records.
Snowsea supports global buyers with commercial freezer production, quality control, OEM customization, export packaging, and container-loading coordination.
Explore Snowsea’s commercial refrigeration products or submit your project requirements through the OEM and ODM service page to arrange production and pre-shipment inspection support.